When you’re a parent in a hockey family, you have to take on a number of roles. You’re a coach, a fan and an equipment manager all at the same time.
That last role may be one of the most stressful because the game requires a lot of gear. The majority of homes aren’t built with professional-grade locker rooms, so finding a place for all the skates, sticks and everything else can be a real challenge.
Not only does proper storage mean those items are kept out of the way, but it also helps keep them in great shape.
The Typical Hockey Gear List
This is what a typical hockey family has in a closet somewhere in their home. You may even have way more than this!
Hockey Sticks (a few different ones)
Skates
Helmet
Elbow and shin pads
Gloves
Hockey bags
Neckguards and shoulderpads
Given how expensive hockey equipment usually is, it’s important to make sure that it wears out on the ice, not on your closet floor.
Fortunately, there is one spot in your home that can become the right place for your family’s hockey gear.
With a little work, your garage could be the substitute for a locker room you need.
Storing Hockey Gear in the Garage
If you create an effective system and some space, you can ensure that everything your players use will remain in good condition.
For some helpful pointers about how to create the perfect storage system for your equipment in your garage, take a look at the accompanying infographic.
Click arrows in the bottom right corner to expand full screen
There are very few among us who are not looking to get healthier and that generally includes losing a few pounds.
Did you know that you can lose weight by doing something other than just hitting the gym or taking part in a workout routine? Undertaking various activities at home can go a long way in helping reduce your waistline.
Research shows that chores like chopping wood, mowing and gardening are great for getting your heart rate up. This means that even simple activities can have a positive impact on your general fitness. Imagine how great you’ll feel knocking out your to-do list while burning up some calories.
To help you on your path we have determined the number of calories one can burn by doing various yard activities. Later on, we will help you understand how you can calculate the calories burned off after each chore depending on your body weight.
Number of Calories One Can Burn By Doing Yardwork
The type of task and the time spent performing it are the main determining factors for the number of calories you will burn when undertaking the task. Your weight will also influence your calorie count and the amount burnt.
There are varying chores you can do if you are looking to lose weight and stay physically fit. For our examples, we will assume a person of approximately 150 pounds. If you look at the picture, the small-sized number will represent a 200 pounds person.
Below are the number of calories you are likely to lose if you perform the respective tasks.
Planting Trees
If you’re ready to take on a beautification project, planting trees can help serve as a great physical activity.
Doing this for about 15 minutes will help you lose around 60 calories.
Undertaking the same activity for one hour will lead to the loss of 238 calories.
Cutting the Grass
Push Mowing
Although it is more difficult, using a power push mower to ensure that your lawn is well kept is a great calorie burner. When you are walking as you use an electric or gas-powered mower with moderate or vigorous effort, your metabolism will be able to use about 340 calories.
This is sufficient to help you lose weight and stay physically fit.
Riding Lawn Mower
For some using a manual or power mower isn’t practical due to personal circumstances or the size of the property.
For those, you can use a riding mower and still burn about 102 calories.
Chopping Wood
How about chopping up some wood over the weekend or splitting a few logs to light up a bonfire! With this yard chore, you will lose a whole 85 calories if you work for 15 minutes.
If you have the stamina to endure the task for one hour, you will be pleased to know that you will have burned 340 calories by the time you are through.
Digging Holes
If you have a small area to create a garden or put up a fence, the work needed to turn the soil manually or create holes with a post-hole digger will not only increase the usability of your land, and possibly its value, but you will also help your body increase its metabolism, which will help burn some calories.
When you perform these tasks for 15 minutes, you can estimate using 68 calories with one hour of the same tasks leading to the consumption of about 272 calories.
Raking Leaves
A task that is needed in almost every season, raking is a great calorie burner as well. Whether you’re raking up leaves in the fall or grass clippings in the summer, engaging in this task will lead to burning 56 calories in just 15 minutes. If you commit to a full hour you can expect to burn about 224 calories.
Trimming Bushes
Some aspects of yard maintenance are more vigorous than you might think. Using either a manual or electric hedger to keep all your hedges trimmed can result in using about 59 calories over 15 minutes.
Keep that up for an hour and you’ll burn 238 calories.
Shoveling Snow
As you probably know, shoveling snow is the granddaddy of all calorie-burning activities. But because it is so grueling please make sure that you’re in the right physical health given the increase in both heart rate and blood pressure.
Bundled up against the cold and manually clearing snow will result in approximately 110 calories burned every 15 minutes. In one hour of continuous activity, you can burn up to 440 calories.
That’s enough to cover that piece of chocolate cake you had after dinner last night!
How are the calories burned from yardwork calculated?
When it comes to the calculation of calories burned from performing yard work, you need to know the number of calories burned per minute of activity. The first step in this calculation is to determine the MET value, which is known as the Metabolic Equivalent Task.
MET refers to the amount of effort needed to complete a certain task for a specific time. Different tasks have different MET values.
Please keep in mind that MET values for specific tasks were arrived at for the purpose of research. These values, therefore, do not directly represent the real energy cost each individual would spend in undertaking the activities featured. Also, different individuals put in varying energy levels when undertaking similar tasks. Additionally, age, gender, environmental conditions, body size, and other factors affect the MET of different individuals.
When calculating the calorie burn per minute, you need to multiply your total body weight in kg with the MET value of the specific activity and 3.5. You then divide the value with 200.
Note: 3.5 and 200 are constant values used in the equation.
Now that you have the calorie burn per minute, you need to multiply it with the amount of time spent performing the task.
Let’s go through an example, shall we?
Let’s assume that you weigh 160 pounds and you have been riding a lawn mower for about 50 minutes. This task has been awarded a MET value of 2.5.
What amount of calories have you burned in this time?
Let’s first convert the pounds to kg
160 pounds = 72.73 kg
The formula to calculate calories burned from riding the mower in one minute is = (2.5 x 72.73 x 3.5) / 200
Calories burned from riding the mower in a minute = 3.182
Since you performed the activity for 50 minutes, the total amount of calories burned during this period = 3.182 x 50
Calories burnt after riding a mower for 50 minutes = 159.1
This calculation process, however, might be a little too much for some people. This is because you have to keep track of all the activities you perform and time. To save you this trouble, there are many online calculators to calculate calorie equivalents. All you need to know is your weight and the time you spend undertaking the activity.
As we stated earlier, the energy expenditure for each individual varies. As such, the calculators are set to use estimations for the Metabolic Equivalent as per research. However, they certainly make your work easier since you do not have to go through the hassle of calculating the calories burned performing yard work.
Final Thoughts
Working out is something that has become trendy as many people strive to keep fit and lose weight. However, not everyone has enough time to go to the gym.
If you want to keep fit without going to a fitness center, there is no need to fret because there are various calisthenics you can engage in at home. With these chores, you will be able to make great progress on your goal to stay fit and healthy.
Feel free to share this infographic on your blog or on social media.
A power cleaner has a great ability to clean, remove grime, algae, and dirt in a quick and efficient way. As such, it can substantially enhance your ability to keep and maintain a clean environment around your property and equipment.
Besides being hygienic, keeping your property clean and well maintained will enhance its value and longevity. If you value time in your cleaning, this machine can be a good investment.
However, if you buy a wrong one, you stand to waste a lot of money and time. As a result, it is essential that you know the aspects that you need to review in the device in order to identify a washer that is right for your cleaning needs.
Here are some of the things to consider.
1. Uses of the Machine
Once you get your machine, you will go through the “clean everything” phase as all new owners do. The deferred maintenance backlog is usually huge for a busy homeowner.
If you need a little inspiration while you wait for yours to arrive, here are just a few of the uses you will have for your new machine.
Driveways
Fences
Brick Walls
Pavers and Walkways
Cars
Machinery
Decks
Swimming Pools
What other things will you use it for besides the main purpose? Make sure the machine’s specifications are suitable and appropriate for what you require and purchase the best model you can afford.
If your intention is to use it for cleaning your car, consider a lower-range unit that is suitable for cleaning cars rather than a high-powered washer that might end up damaging the paintwork of the car.
However, if you intend to use it to wash your patio or concrete driveways, then the higher pressure is suitable to remove all the tough dirt.
Some models also have different power settings which can be useful when cleaning delicate items.
2. Portable/Stationary Models
Whether you want a stationary or a portable cleaner, you will need to consider the intended purpose of the washer you have in mind. If you don’t want to move your machine around but prefer to keep it in a confined room, then the stationary washer could be great for you. This type, however, is a bit expensive to keep and maintain.
Alternatively, a portable one is convenient in terms of use in multiple areas. You can roll or pull them on their rubber tires to wherever you may wish to use it.
3. Gas or Electric
The electric and gas powered cleaners differ in the way they pressurize water, speed, and the strength at which water comes out.
They are also lighter and are convenient for simple home and garden pressure washing applications like car cleaning, cleaning of garden tools and furniture, motorbikes’ cleaning, and bicycles’ cleaning. However, they must be plugged into a power source and cannot operate where there is no outlet.
Gas pressure washers, on the other hand, are suitable for a professional and regular application. They are also convenient if you want to handle heavy-duty pressure washing jobs and might prove to be more effective than electric ones since they offer more power.
More importantly, they don’t need you to plug into a power source. If you intend to use your cleaner for lighter home washing needs, choose an electric model.
You will be better off with gas-powered, however, if you intend to use it on heavy duty applications such as cleaning patios, decking, driveways, lawnmowers, walls, and fences.
4. Hot or Cold Water
Most stores have more cold water models than hot. This is because cold-water cleaners are not as complicated as the hot water versions are, are easily portable, and are more convenient.
Hot water units clean much better mainly because the higher water temperature helps the molecules expand and assist in moving dirt and grime away. They also use less soap and are faster in their cleaning. The hot water washers’ sanitizing capabilities are also better than those of cold-water machines are.
As such, they are suitable for industrial or farm use. If you want a machine for home cleaning, choose a cold water unit unless you have something crazy like a meat locker that needs to be clean and sanitized all the time.
5. Power
Pressure cleaners state their power in two ways; pounds per square inch (PSI) and gallons per minute (GPM). These two values make up a model’s CU (cleaning units).
To get the CU of the machine you intend to buy, simply multiply the PSI and the GPM of the machine. The greater the CU of the pressure washer the better the ability of the machine to clean effectively.
A high-powered unit will enable you to clean your surface quickly and effectively without the need to scrub it.
6. Noise Levels
On average, a gas-powered model produces about 85 dBA of noise during operation while the electric one produces about 78dBA on average. Consider buying a machine with lower noise levels if you don’t want to disturb your neighbors while working.
7. Warranty
In the market, you will find products that offer different types of warranties. Some will claim to have a longer warranty than the others do while others will claim to have the most comprehensive warranty.
Carefully, read the fine print and get to know what the warranty covers. Does it cover the frame, engine, or the pump? You may be surprised what some of the manufacturers offer as their warranty, so choose one with a warranty covering the engine and pump.
Helpful Tips to Maintaining your Pressure Washer
Regular maintenance of your pressure washer will enhance your safety and improve the durability and reliability of your washer machine. By keenly following the tips below, you will get to enjoy more benefits from your pressure washing unit.
Before Using
These are the tips to maintain your pressure washer before using in order to enhance performance and proper working order.
Ensure the o-rings of your pressure hose are free of wear and tear. If the o-rings are damaged, they could cause serious issues such as leakages and damage during operation. Consider replacing them if they are damaged before use.
Ensure to confirm that the nozzle is securely locked in place.
Check whether you have plugged the nozzle with debris or any dirt.
If you are using a gas-powered machine, make sure you have fresh oil and gas before you start your cleaning. Do not operate your pressure washer with oil that has sat in the tank from the previous season. It is important to add an additive and finally top it with new gasoline.
Check whether your spark plug is corroded. A corroded spark plug can cause difficulty in starting and compromise the machine’s efficiency during operation. Ensure to replace corroded spark plugs before using.
After Use
Always switch off the power and unplug the unit as a first priority to prevent damage to the machine.
Clean the detergent intake; clean it thoroughly with clean water leaving it clear.
Wash all the dirt from the interior of the machine to prevent any irregular behavior while in use.
Drain excess water out prior to storing. Any left water can grow mold or bacteria.
Keep your pressure washer in a safe and well ventilated out of the rain, snow, or direct sunlight.
Important Note
Make it a priority to follow the manufacturer instructions regarding the usage of your machine and maintain it properly. In addition to improving productivity, this will also enhance the safety of the machine, yourself, and others.
Screwdrivers could easily be considered the most important tool for any handyman. Although the Phillips screwdriver tends to be the most popular and most widely used, there are several different types, each with a specific purpose, including woodworking, fasteners for small electronics, wood construction, sheet metal, factory builds, and more.
This guide will give you information about each of the screwdriver types and help you find out what they are best used for.
Choosing and Using a Screwdriver
Almost everything that is built or manufactured will probably require a screwdriver of some sort. Most things can be assembled using a flat blade screwdriver or a Phillips screwdriver, but this doesn’t mean that you should use these.
The type that you use will depend on what you are building and how secure you need that item to be.
Some screwdrivers have the bit built-in, and it can’t be changed. This is the case with most manual flat blades and Phillips.
However, these give you limited uses. If you want the most versatility, another option is to get a driver to change out the bits.
Multiple-bit type screwdrivers like this are convenient in a limited toolbox or on the go. Get a sturdy one that will be sure to secure all of the components.
This will give you the most versatility, especially if you get a kit with all or most of the types of screwdriver bits.
Using the right drill bit with your screwdriver or using the correct screwdriver is essential so you can prevent stripping the screw heads or cam out. This is when the screwdriver slips out of the fastener due to torque that could be too high.
Cam out can damage your drill bits and the fastener to a point where they are no longer usable. Prevent cam out by using the right tool for the job.
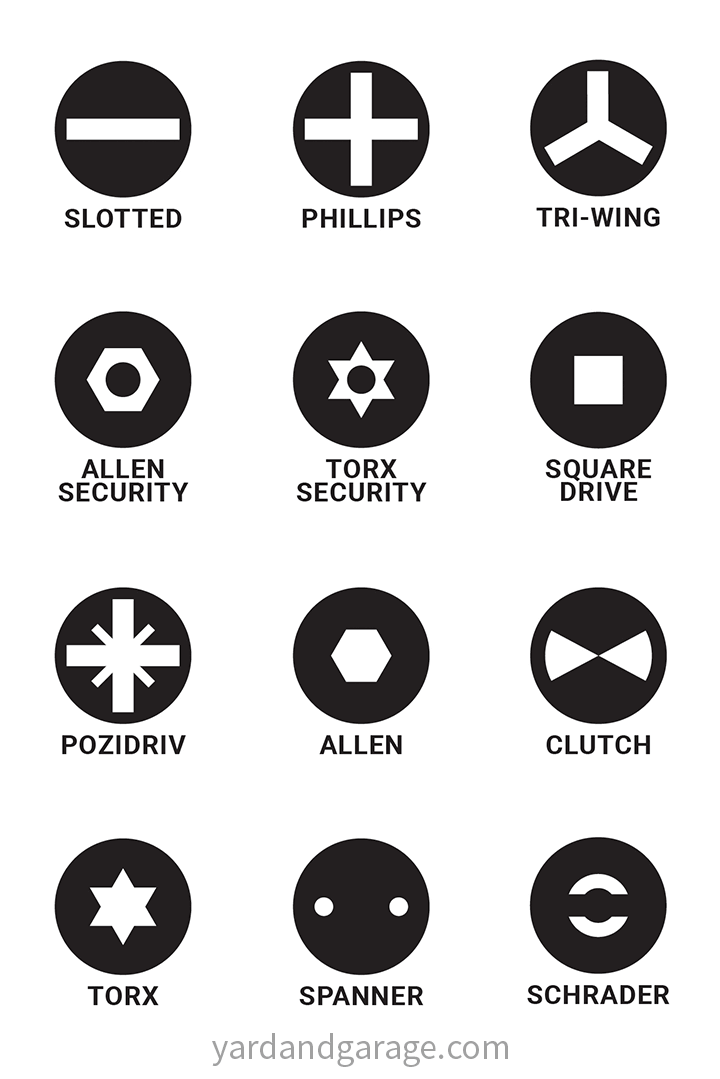
In the following section, twelve different screwdrivers are introduced, and their top uses are explained.
Twelve of the Most Common Types of Screwdriver Heads
Flat Blade (Slotted)
Of all the types of screwdrivers, the Flat blade is one of the oldest tools that people use, dating back to the 1500s. As the name indicates, the end of the screwdriver is flat.
The screw that it uses has a single, long slot. As with most screws, tightening is done with sound, clockwise turns.
This allows it to fit into many different sized or shaped fasteners. The size of the screwdriver usually indicates two measurements–the blade width and shaft length. However, the thickness of the blade isn’t traditionally marked.
Flat blade screwdrivers are some of the most versatile screwdrivers available because they can be used in so many different applications.
Phillips
The Phillips screwdriver was named after its inventor, Henry Phillips. It was first used by General Motors in 1936 in the building of Cadillacs. This screwdriver has an X-shaped head that allows it to produce more torque, which makes it great for heavy-duty applications such as building cars.
What sets the Phillips apart from a flat blade (besides its design) is that it’s self-centering and has a tighter fit. This means that you can use one hand to turn a fastener, which also makes it extremely useful in automated assembly systems. As a result, this screw is used the most in all applications, consumer and industrial.
Square Head (Robertson)
The square head screwdriver, also known as the Robertson screwdriver, was invented before the Phillips screwdriver. Invented by and named after a Canadian named P.L. Robertson in 1908, this screwdriver was made because of the problems with using a flat blade.
It looks like a regular flat blade except that the end is square instead of flat.
This is a self-centering screwdriver with a good, tight fit like the Phillips and is much more secure while turning a fastener. Unfortunately, the driver (as well as the Robertson screw, which he also invented) didn’t take too well in Canada. Still, they were a success in the United States. Ford was one of the first automotive manufacturing companies to begin using them.
Now there are five different-sized Robertsons available. In addition, they are color-coded to match different-sized compatible fasteners.
Allen Wrench Screwdriver
The Allen wrench, also sometimes called a hex wrench, hex key, or an Allen key, are small, L-shaped wrenches with a hexagonal-shaped end.
Today, Allen wrenches and compatible fasteners have become increasingly popular with furniture that consumers can assemble at home using small ratchets.
This tool is so small and inexpensive to produce that they are often included in the box with the furniture. Allen wrenches can come in different sizes (diameters). The three most popular are the 5/32-inch, 3/16-inch, and 1/4-inch.
These fasteners and wrenches are also commonly used in bicycles and motorcycle engines.
Torx
The Torx screwdriver, also commonly called a star screwdriver, was invented by a company called Camcar Textron in 1967. The complimenting screw was designed to be mostly tamper-resistant and is used in products such as computers, car engines, and construction.
These screwdrivers come in 100 different sizes, labeled from T1 (the smallest) to T100. In addition, there are a few different types of Torx screwdrivers. One is the original Torx, a six-pointed star shape screw and screwdriver that is self-centering.
Another kind is the Torx Plus which is shaped slightly differently than the original. It allows more contact between the screwdriver and the fastener to withstand more torque than the original screwdriver.
Allen Security Screwdriver
The Allen security screwdriver also called a hex security screwdriver or a tamper-resistant hex screwdriver was created to secure products that manufacturers don’t want the general public to have access to. These screwdrivers aren’t available on the general market.
The complimenting screw has a small metal post in its center that prevents regular Allen screwdrivers from working on it. The Allen security tools (as well as the complimenting screws) come in these standard sizes: 1/8, 3/32, 3/16, 1/4, and 5/16.
Schrader Valve Bit/Driver
For Schrader valves, the drivers often come in kits with interchangeable Schrader valve bits. The driver and bits allow for installations of Schrader valves which are commonly used in HVAC systems, engines, and tires.
These tiny valves are often sticking out from whatever unit they are attached to. In tires, for example, they are the valves that you use to put air in the tires.
These pneumatic valves are under much pressure and must be installed precisely to prevent malfunction and/or injury. Because of this, high-quality bits and drivers are essential.
Tri-Wing Screws
Tri-Wing, also sometimes called triangular slotted, can often be confused with tri-tip screwdrivers but they are very different. Unlike the tri-tip, the tri-wing’s center is off-set.
The tri-wing fastener is a triangle with three “wings” extending from each point. Unfortunately, these screwdrivers aren’t standard for general consumer use.
Originally these were developed for use in the aerospace industry. However, tri-wings are now used in gaming consoles and mobile phones.
Torx Security Screwdrivers
This is another version of a Torx screwdriver. This type of screwdriver is not generally available to the public because it is used in products that the average person shouldn’t be unscrewing.
The complimenting screws have a metal piece in the middle to prevent tampering, so a regular Torx screwdriver won’t work on them.
The Torx security screwdriver is specially made with a hole in the middle to accommodate these special screws.
Pozidriv
This screwdriver type is very similar to Phillips screwdrivers and can sometimes be confused with them. However, Pozidriv has an additional shallow X whose lines are at a 45-degree angle with the deeper X that would be found on the Phillips.
These types of screwdrivers can handle a much more significant amount of torque than others. While these two kinds of screwdrivers are interchangeable, it isn’t recommended because the screws and the screwdrivers can become damaged.
Using a Pozidriv screwdriver with a Pozidriv screw provides the best results. Since it is self-centering, you can get more torque while still reducing cam-out.
Clutch
These special tools are made to go with their corresponding Clutch screws. There are two types: Type A and Type G.
The end of the Type A screwdriver looks like a butterfly with a round knot in the middle. Type A is sometimes called the standard clutch and these screws were commonly used in GM vehicles several decades ago.
Type G drivers are more common now. The end of the Type G looks like a butterfly without the knot. The corresponding screws are considered security screws. A flat head can screw them in, but they are specially designed so that only a clutch can screw them out.
Type G clutch screwdrivers and screws are very often used in building mobile homes. Because of the security feature, they are also used in prison fixtures and school/college fixtures.
Spanner Drivers
The Spanner screwdriver, also sometimes called the Snake-Eye (patented), pig nose, drilled head, or the twin-nose screwdriver features two small, long, thin, round bars connected to the end of the driver.
This is a self-centering driver, and it is also used for security applications (used with security spanner screws).
Spanners are used in several different applications that couldn’t be more different from each other.
They can be used on anything from elevators to spikes for golf shoes.
A Few Types of Screwdriver Sets Available
While some of them aren’t for the general public, many of them are, so your business or your home garage workshop can be prepared for whatever job comes your way. You’ll feel like Bob Vila when you know about all the screwdrivers and which situations to use them in.
Keep in mind that cheap screwdrivers may not work as well as you want, especially if you have heavy-duty jobs. Invest in the best tools you can the first time around to save yourself a headache. At the very least, you should own a few sizes of phillips, flat heads, and Allen wrench head drivers.
These three sets of screwdrivers can get you through most household and DIY tasks and should be present in your toolbox.
Final Word on Screwdriver Types
When it comes to screwdrivers, there are different types for a variety of purposes. I hope that this article has helped you better understand the difference between each type and which one would be best for your needs.
Now is the time to fill up your toolbox with everything from Phillips head screwdrivers to ratcheting screwdriver sets!
Many people install freezers or refrigerators in their garage without giving it a second thought. If it is an older model that is less sensitive to temperature changes, they may not have too many problems. The newer and more efficient models tend to be more sensitive to external temperatures.
Here are some things to think about if you want your garage fridge or freezer to last many years.
What’s Wrong With a Garage Install?
The problem with installing a regular kitchen refrigerator or freezer in your garage comes about when an uninsulated garage reaches extreme temperatures. In the summer, this can cause the compressor to deteriorate and fail from the excessive run-times in scorching weather.
In the winter time, the thermostat may never turn on to cool the freezer. This may freeze the contents of items in the refrigerator section. This is because most models do not have a separate freezer thermostat.
When the refrigerator section drops below a certain point, it will simply suck the air out of the freezer unit. Some refrigerator/freezer combinations come with dual thermostats.
Check the Installation Instructions
The best method of determining if the refrigerator you are considering will work in your garage is by reading the installation instructions. In no uncertain terms, the instructions will give you the means and extremes of external operating conditions that it is approved to run in.
Although it may be possible to install a garage refrigerator kit to make any refrigerator respond properly to outside temperatures, this does not address the high-energy consumption problem in the summer. These kits aren’t expensive but require some wiring skills to manipulate the control box of your refrigerator.
It is probably a job best left for a professional if you don’t have experience with other household wirings, proper tools, or working knowledge.
Running your refrigerator outside of the suggested external temperature operating range published in the instruction manual will void the warranty.
Outdoor Refrigerators are Not Always Garage-Ready
Some refrigerators are sold as outdoor refrigerators or garage-ready. Nevertheless, because the devil is in the details, you need to find out what exactly that means. Refrigerators that are made to withstand outdoor weather may not be suited for the particular climate that you live in or may be very expensive ($1,000-$5,000).
The advantages of the higher quality outdoor refrigerators may be more than enough for a garage. These units have beefed up compressors and components to handle the load of running longer and keeping food frozen when it is blazing hot outside.
In addition, they have thicker insulation that creates a barrier to the external temperature fluctuations.
The weatherproofing and anti-corrosion features are a plus if water seeps into your garage from time to time. The UV protection is probably not a big issue if you plan on stashing your refrigerator in a garage behind walls and not panes of glass.
Alternatives for Installing a Garage Refrigerator
Rather than beefing up the installation of your garage refrigerator by purchasing an outdoor model, you can create your own small climate-controlled room for the refrigerator.
You can’t simply wrap the refrigerator in insulation because it needs room to breathe, and the coils need airflow to cool off when it is running. Depending on your environment, you can build a small shed or enclosure to encapsulate your refrigerator.
You can install as much insulation as you’d like to get the room up to a stable temperature range. A simple incandescent bulb may be sufficient to raise the temperature in the winter.
Remember that the EZ Bake oven that kids used to bake cakes? It was powered by nothing more than an ordinary household incandescent light bulb. A fan blowing across the coils may be sufficient to cool it in the summer.
Garage Quirks
GFCI Garage electricity may be wired differently. It may be based upon a ground-fault interrupter circuit (GFCI). GFCI’s were created to prevent people from being electrocuted from things like dropping a hairdryer in the sink.
The GFCI can be tripped more easily than ordinary household electrical circuits. It is designed to respond in fractions of a second for even a small 5-milliamp spike. You may not check your refrigerator every day to notice and can come home to a fridge full of spoiled foods.
Fire Hazards Most people store cleaning items and automotive repair items in their garages. If you have gasoline for the lawn mower, oil jugs, or other flammable substances near your refrigerator, you increase the risks for lighting your garage up like a book of matches.
The coils are transferring heated refrigerant and can raise the temperature of objects in close proximity.
Power Switches Many garages are wired for convenience and safety by having everything connected to the main light switch. If you have a switch located on the circuit of your refrigerator, you run the risk of being absentminded and flicking the switch one day instead of pulling the string on the light.
Other family members, especially kids, may not be very responsible when it comes to remembering the switch. Why take the risk? Make sure your refrigerator is properly grounded and wired correctly.
Sawdust and Debris Many people do some woodworking projects in their garages and can accumulate a lot of sawdust and other debris. This is a potential drag on the efficiency of your refrigerator if it clings to the coils.
Always be sure to keep the coils clean and allow for sufficient operating airflow around your refrigerator.
Mold and Mildew Unfinished garages are more susceptible to the development of mold and mildew. This can build up on the seal from external humidity condensing on the cool surface when it is hot and humid outside.
Now that you know why those garage refrigerators thaw out your frozen goods in the winter and drive up your electric bills in the summer, you are better equipped to prevent the damages. Whether you decide to build an enclosure to control the temperature or simply go for the convenience of a reasonably priced outdoor garage-ready appliance rated for your climate, either choice is sure to save you money down the line by avoiding burnt out refrigerators and high electric bills.
If your garage is not perfectly wired for a pricey refrigerator, it never hurts to call an electrician. The bills you pay for improvements to your property can always be kept as further evidence of its value. A fully finished garage may be an even better investment idea if you don’t do a lot of heavy work in the garage.
You might want to consider keeping your extra fridge in a basement if you have space and simply need extra storage. If you need the convenience, consider investing in a portable mini fridge or a simple cooler for those days when you are out there working and need a drink or snack.
Proper garage lighting is a high priority for those of us who spend a lot of quality time working on home repair projects, maintaining our vehicles, or engaging in a hobby.
Your best option for longevity and a manageable electric bill is LED lights. Shopping for garage lighting isn’t a task many want to spend a lot of time on so hopefully this guide will help you out.
I’ve put together a review of some of the top-selling light-emitting diodes (LED) lighting kits so you can make the best decision for your garage and your budget. Here are my picks for the best LED garage lights.
The [amazon link=”B07X7WQYY4″ title=”Airand 4 foot LED shop light” link_icon=”amazon” /] is perfect for all those dark spaces that need a little brightness. They are great in garages, workshops or where ever else you need some extra illumination. Plug it in while you go do other things and before you know it, the room will be brightened up as never before.
The high output LEDs don’t take up much energy so your electric bill stays at an affordable level even during peak hours of use! There’s not much they can’t handle…basement, garage, workshop and utility room included!
The single set does just enough to light up a small area, and link two sets together if you need more light. Modular design allows you to combine as many units (in different shapes too!) as needed to reach the desired amount of brightness in your workplace.
If nothing else, [amazon link=”B01LX4ZTYI” title=”the Striker light system” link_icon=”amazon” /] is different in that it is not the traditional rectangular model. This is a good tri-light model with adjustable heads. Installation is simple – all you do is remove an existing bulb, replace it with this tri-light system and screw it in. That really is all there is to it.
And for those of you that are environmentally focused, you can get more light with less energy at 3,000 lumens at only 25 watts. The adjustable heads will allow you to focus the light in whichever areas you need.
These lights are more expensive than the others on our list, especially on a per lumen basis. And while this lighting system comes with a motion sensor it appears to be extremely sensitive and off-putting to a lot of users.
And given its installation, you won’t be able to link multiple units over the space that requires illumination.
Striker Pros
Adjustable heads
Economical cost per lumen
Extremely easy installation
Striker Cons
Motion sensor super sensitive
Light output may be insufficient
#3. Lithonia Lighting SGLL 24 40K 80CRI PIR M4 LED Garage Light with Motion Sensor
Too Many Features for a Homeowner’s Garage Light System? [amazon box=”B01L9NMB94″]
Review:
Lithonia is a well-known name and has several great models of lighting systems. [amazon link=”B01L9NMB94″ title=”This particular model” link_icon=”amazon” /] produces 5,000 lumens but only requires 80 watts to do it. It has a 360-degree motion sensor with the ability to preset the automatic timer at 1-10 minutes.
It can be installed using either the included suspension or flush to the ceiling. The unit claims an average life of 50,000 hours and also has a limited 5-year warranty.
For these reasons, we think this unit by Lithonia is a contender for the best LED garage lights title.
Unlike other models, this unit is smaller at only 24 inches whereas other models are generally in the 48-inch range. Also, while these units can be linked together it is limited to a maximum of two units.
And as with most systems, you’ll probably need an extension cord to complete the installation.
The cost per unit is also much more expensive especially considering the number of watts required. Multiple users have also reported an unsightly yellow tinge in the lighting which they have found offputting.
Pros
A 360-degree motion sensor
High-efficiency driver
5,000 lumen
Cons
High cost per lumen
Yellow cast to lighting
Can only link two units
#4. Hykolity 4FT 40W Linkable LED Shop Light with Pull Chain
4800lm Surface Mount/Hanging Garage Utility Light with cord, 5000K Workbench Light, 64w Fluorescent Fixture Replacement, ETL and DLC listed
You may have heard of Hykolity and their UFO commercial lighting, but I am impressed with this super bright garage system (check price on Amazon). At 40 watts, this light produces 4,800 lumens which is one of the brightest options we have seen.
Are you ready to save money and get more light in your workspace? Additionally, this Hykolity system like others that we have reviewed, has the ability to link multiple units together.
However, this system can link up to 20 units to cover even the largest of garages.
These lights boast a 50,000-hour life, have an aluminum composite body and a limited 5-year warranty. The primary complaint that users have is that the packaging used in delivering the system is flimsy and can result in a damaged product. In those instances, customer service has proven to be friendly and quick in supplying replacement products.
Pros
Link up to 20 units
4,800 lumens
Easy to install
Low-cost option
Cons
Non-durable packaging
#5. Leonlite 4ft Linkable LED Motion Activated Utility Shop Light
40W (120W T8 Tubes Equiv.) LED Ceiling Fixture, 4100lm, Energy Star & ETL Listed, 4000K Cool White, for Garage/Basement/Workshop
Leonlite is a relative newcomer into the garage LED lighting business but they have already managed to produce a best-selling system at a great price. They also produce a motion-activated light, and as we have seen with other systems, they can be linked together to cover a larger area.
Their best LED model we have found is the 4ft Linkable kit. What is special about this shop light (check price on Amazon) is that the lights are not merely linkable but can be installed flush with one another, giving them a sleek appearance and ability to fit into tight spaces.
The output is a little over 4,000 lumens at only 40 watts and has a daylight option in addition to the cool white. In addition to the traditional mounting system, one can also use the chain system as well.
A traditional pull cord is also available to turn the unit on or off. Also as we’ve seen with the other systems you’ll most likely need an extension cord if the lights are centrally placed.
Pros
Flush mount
Great light output
Simple installation
Cons
Motion sensor may be unreliable
Cheaper housing materials
What are the Advantages of Using LED Lights in the Garage?
The age of the incandescent light bulb is fast drawing to a close. It’s been a good run, and this seemingly simple invention has helped change the world beyond recognition over the last century or so.
However, traditional bulbs are highly inefficient and overly fragile, and while various new lighting technologies have been developed to fix these problems, each had their downsides and failed to make enough impact to overturn the dominance of the incandescent.
Modern LED lighting could be the technology that sounds the death knell for traditional lights, however, thanks to its excellent combination of cost-savings, convenience, and attractive light quality. Why do we think LED bulbs fit the bill for best garage lights?
LED Lights are Efficient
LED lamps offer reliability and a long life, typically lasting 50,000 hours compared to 1,000 for a traditional bulb. Instead of constantly replacing bulbs throughout your home, you can plug LEDs in and then largely forget them.
LED lamps use less than a tenth of the energy of traditional bulbs while providing the same bright lighting power. That is good for both your energy bills and for the environment.
They’re also eco-friendly in other ways. LED bulbs are fully recyclable, and contain none of the poisonous materials such as mercury that old lighting methods use.
LEDs Have a Long Lifespan
LED bulbs are also extremely durable. They won’t fail during an electrical surge, and all but the most violent knock will do them little damage. Also, as LED lamps age, their brightness diminishes rather than simply blowing out, giving you plenty of time to stock replacements.
LED light works on a tightly controlled wavelength, meaning there are less harmful UV emissions and less energy wastage through heat.
They Provide Good Lighting at a Great Price
The cost of an LED bulb has plummeted over the last few years. You can now buy a generic bulb for less than $5, which considering the long life and low energy usage makes LED an extremely economical lighting method.
Modern LED lighting gives a warm and comfortable glow, in contrast to the harsher, colder light which was typical of previous energy-saving devices. These fittings can now be dimmed in intensity as you wish, and the light’s color temperature can even be varied to suit your tastes.
Edison’s brainchild, the incandescent bulb, has survived for well over a century thanks to its convenience and the comfortingly warm quality of its light. Newer technologies have never entirely displaced older bulbs in the public’s affections, with each type suffering from distinct drawbacks.
Modern LED lighting seems set to change all that, with all the major problems overcome, and massive improvements made in energy efficiency and cost. Is it time you considered switching?
LED Lighting: Why Should You Consider Using it in Your Next Home Decor Project?
The traditional incandescent light bulb has been around, largely unchanged in design, for nearly 150 years. This is despite its drawbacks. High fragility and energy-inefficiency are just two of many good reasons for leaving traditional bulbs behind.
Although replacement technologies such as halogen have failed to gain widespread popularity, it looks as though LED lighting might finally be the lighting solution to challenge the old-fashioned incandescent light’s dominance.
What has changed to make this so?
Energy Efficiency
Traditional light bulbs are incredibly wasteful of energy, with up to 90 percent of the electricity used transformed into heat rather than light. LED lighting uses only about one-sixth of the energy to produce the same amount of illumination, with obvious savings in electricity bills as well as benefits for the environment.
Long Life
Incandescent bulbs are extremely fragile. Not only are they easy to damage through rough handling, but they also fail relatively quickly under normal use. An old-fashioned bulb will typically last about 1,200 hours before burning out, while an LED lamp will last for at least 25,000 to 50,000 hours.
In fact, LEDs rarely fail completely; they simply become less effective and have decreased brightness as they near the end of their useful life.
Color Range and Warmth
One reason for traditional bulbs’ long-standing popularity is the quality of the light they provide. Most people find incandescent light gives a warm and comfortable glow, while alternatives are often seen as harsh, cold, and clinical.
Advances in technology have largely solved this problem, and modern lamps closely mimic the color temperature of ordinary bulbs. Some of the best fittings can even vary the color output to suit your mood, with illumination ranging from a candle-like warmth to that of a bright summer’s day.
Flexibility of Installation
Early models required large heatsinks to cope with the excess energy produced by the electronics behind the lamp.
Unlike traditional bulbs, little of the LED’s energy is radiated away as heat; this limited the spaces in which the older LEDs could be installed.
Thanks to clever design advancements, this previously major obstacle has been overcome, and bulbs are now available that can be dropped straight into traditional fittings.
Lower Prices
The biggest concern that had prevented many people from changing over to LEDs was the high price. In the early days, a single bulb could cost upwards of $100.
This figure has plummeted over the last few years, and a high-quality, top-shelf bulb can now be bought for $10 or less. While this is still nearly 10 times the price of an incandescent bulb, the lower energy usage and longer lifespan make LEDs by far the cheaper option over the long term.
Incandescent light bulbs have had a long run of success and popularity since they first revolutionized society in the late 19th century. Because of their drawbacks, however, the time is ripe for a more effective replacement. With the benefit of the latest technological advances, LEDs are finally ready to step up to the plate. Shouldn’t you be considering them when you next update your home decor?
Summary
As you can see, it really is the time of LED lights. Be sure to use our buying guide so you get the best lights for your garage!
10 Things To Know Before Buying LED Light Bulbs.
Due to their very low power usage and longevity, LED light bulbs are growing in demand to replace conventional lighting for those that are concerned about the Earth’s longevity. These bulbs may have a higher upfront cost, but the technology is improving and prices are set to keep going down. This section is not about convincing you to purchase LEDs, but rather educating you on what you will be getting into.
1. You May Not Want to Switch Your Entire House to LED.
Your switch to LED light bulbs needs to make sense depending on your living situation. The relatively high upfront cost of the bulbs should be worth the long-term electrical savings.
Check which rooms you use frequently or infrequently to determine where to install the new bulbs. If you use the light in your kitchen or living for hours on end every day, it would definitely be worth the switch. If you seldom use the guest bedroom or back porch lights, you may as well keep your standard bulbs.
2. Don’t Bother Upgrading From CFL
If your decision to change is based purely on reducing your electric bill, a switch from CFL to LED would be rather underwhelming. LED lighting is the clear winner in power consumption, but the difference may only be by a few watts. Considering the higher upfront cost of a new bulb, it may take several months before you begin to save money.
3. Some LED Light Bulbs are Dimmable.
Most manufacturers will create dimmable and non-dimmable light bulbs and it will be indicated on the package. Dimmable bulbs will usually come at a higher price tag and be sold with dimmer switches as part of a pack. You must keep in mind that dimmer switches may not be compatible with other manufacturers since it may not use the same circuitry.
4. Your Low Voltage Lighting Transformer May Need to be Replaced.
If you have low voltage down-lights or track lighting, you may consider replacing your bulbs for more efficient LED ones. Although it is a great idea, some manufacturers will have proprietary lighting transformers that could cause compatibility issues with other bulbs.
There are some types of low voltage transformers that could take a LED bulb, but it may reduce its lifespan. Since it’s better to be safe than sorry, it is worth removing the transformer and installing the correct LED driver.
5. LED Bulbs Will Lower IR and UV Emissions
LED bulbs will emit a negligible amount of either IR or UV light in comparison to standard bulbs. Since these types of electromagnetic radiation may increase the risk for skin cancer, it will make you feel safer within your own home.
Besides health concerns, an LED bulb will not have a destructive effect on fabrics, clothes, paintings, and other sensitive items. UV light neutralizes chemical bonds in colors, so you may end up with faded exteriors on your high-value possessions. Infrared light may cause materials to expand, leaving them in a weakened state and destroying its value. This may be a good case for why LED should be used more often in manufacturing or places of storage.
6. They are Used for Light Therapy.
Arthritis, depression, and other illnesses have been successfully treated with infrared light since the late 1980s. Since LED lights may be manufactured with the correct light spectrum, power hogging lighting systems may be scrapped in favor of LED. In fact, many hospitals around the world are installing LED infrared lights in their recovery rooms.
This won’t be a deciding factor for garage LED lights but it is a nice benefit. Maybe it could be a selling point to your wife?
7. They Have A Significantly Longer Lifespan
One of the most awesome aspects of buying an LED bulb is that you may have it with you for years. Incandescent bulbs are rather disposable since they will typically burn out around the 1,000-hour mark. A CFL bulb is only slightly better at 8,000 to 10,000 hours. Assuming you buy a good quality LED light, it can last up to 50,000 hours before needing a change.
For garage lighting, this is a huge plus. Garage ceilings are usually pretty high and nobody wants to take the time to pull out the ladder and swap out bulbs.
8. Trailing Edge Switches Are Optimal For Dimmable Bulbs
Although standard dimming switches will work with these newer bulbs, the lighting quality will likely be very poor. Trailing edge switches are designed to work with very low wattages, like that of an LED light bulb. In some cases, using a standard switch may work OK, but it may cause flickering or no dimming at all.
9. Avoid Mixing & Matching Dimmer Switches
Manufacturers of dimmable LED switches will often use their own patented circuitry that may not play well with bulbs of other brands. Incompatible bulbs may lead to flickering or complete failure of all the lights within the same line. This is why dimmable bulbs and their respective dimmer switches are often packed together.
10. You May Not Have To Sacrifice Lighting Quality
A stereotype of LED bulbs is that they will poorly light a room, making the decrease in electricity usage not worth it. Although this may be true with some low-quality or ultra-low wattage LED lights, there are many types of bulbs that can match the performance of incandescent bulbs.
For garage lights, you will want as much illumination as you can stand. When working on cars, mowers or other intricate machinery you must have good lighting to get the work done.
Look for products that have SES, ES, BC, or SBC caps that can be used as replacements for your incandescent equivalent. You may also see these bulbs rated as 25-watt to 100-watt equivalent, giving you an idea of the lighting capacity.
After familiarizing yourself with these key points, you should be able to make an informed purchase. The progress of technology has only been getting better and future products will likely out-shadow what we have today. If you decide to switch over a significant amount of your home, office, or garage to LED, it is always a good idea to have a qualified electrician to install new fixtures when necessary.
Final Verdict: Best LED Lights For Your Garage
It’s obvious that there are a lot of fantastic options when looking at garage lighting solutions. There are quite a few other well known brands that didn’t make our top 5 including garage lighting stalwarts like Sunco Lighting. The team at Yard and Garage will continue to research products in the LED utility shop light category as they become available.
The ability to link up to 9 additional units is attractive especially as I consider that a great timesaver on installation for experts and non-experts alike.
I hope that this review helps you to finally make that move towards replacing those fluorescent lights and getting the garage lighting you deserve!


 If you’re ready to take on a beautification project,
  Although it is more difficult, using a power push mower to ensure that your
  For some using a manual or power mower isn’t practical due to personal circumstances or the size of the property.
 How about chopping up some wood over the weekend or splitting a few logs to light up a bonfire! With this yard chore, you will lose a whole 85 calories if you work for 15 minutes.
 If you have a small area to create a garden or put up a fence, the work needed to turn the soil manually or create holes with a post-hole digger will not only increase the usability of your land, and possibly its value, but you will also help your body increase its metabolism, which will help burn some calories.
 A task that is needed in almost every season, raking is a great calorie burner as well. Whether you’re
  Some aspects of yard maintenance are more vigorous than you might think. Using either a manual or
  As you probably know, shoveling snow is the granddaddy of all calorie-burning activities. But because it is so grueling please make sure that you’re in the right physical health given the increase in both heart rate and blood pressure.


 The electric and gas powered cleaners differ in the way they pressurize water, speed, and the strength at which water comes out.
 Gas pressure washers, on the other hand, are suitable for a professional and regular application. They are also convenient if you want to handle heavy-duty pressure washing jobs and might prove to be more effective than electric ones since they offer more power.
 Regular maintenance of your pressure washer will enhance your safety and improve the durability and reliability of your washer machine. By keenly following the tips below, you will get to enjoy more benefits from your pressure washing unit.
 Of all the types of screwdrivers, the Flat blade is one of the oldest tools that people use, dating back to the 1500s. As the name indicates, the end of the screwdriver is flat.
 The Phillips screwdriver was named after its inventor, Henry Phillips. It was first used by General Motors in 1936 in the building of Cadillacs. This screwdriver has an X-shaped head that allows it to produce more torque, which makes it great for heavy-duty applications such as building cars.
 The square head screwdriver, also known as the Robertson screwdriver, was invented before the Phillips screwdriver. Invented by and named after a Canadian named P.L. Robertson in 1908, this screwdriver was made because of the problems with using a flat blade.
 The Allen wrench, also sometimes called a hex wrench, hex key, or an Allen key, are small, L-shaped wrenches with a hexagonal-shaped end.
 The Torx screwdriver, also commonly called a star screwdriver, was invented by a company called Camcar Textron in 1967. The complimenting screw was designed to be mostly tamper-resistant and is used in products such as computers, car engines, and construction.
 The Allen security screwdriver also called a hex security screwdriver or a tamper-resistant hex screwdriver was created to secure products that manufacturers don’t want the general public to have access to. These screwdrivers aren’t available on the general market.
 For Schrader valves, the drivers often come in kits with interchangeable Schrader valve bits. The driver and bits allow for installations of Schrader valves which are commonly used in HVAC systems, engines, and tires.
 Tri-Wing, also sometimes called triangular slotted, can often be confused with tri-tip screwdrivers but they are very different. Unlike the tri-tip, the tri-wing’s center is off-set.
 This is another version of a Torx screwdriver. This type of screwdriver is not generally available to the public because it is used in products that the average person shouldn’t be unscrewing.
 This screwdriver type is very similar to Phillips screwdrivers and can sometimes be confused with them. However, Pozidriv has an additional shallow X whose lines are at a 45-degree angle with the deeper X that would be found on the Phillips.
 These special tools are made to go with their corresponding Clutch screws. There are two types: Type A and Type G.
 The Spanner screwdriver, also sometimes called the Snake-Eye (patented), pig nose, drilled head, or the twin-nose screwdriver features two small, long, thin, round bars connected to the end of the driver.

 The advantages of the higher quality outdoor refrigerators may be more than enough for a garage. These units have beefed up compressors and components to handle the load of running longer and keeping food frozen when it is blazing hot outside.
 Rather than beefing up the installation of your garage refrigerator by purchasing an outdoor model, you can create your own small climate-controlled room for the refrigerator.
![Best LED Garage Lights For a Home Workshop [2021 Review]](https://yardandgarage.com/wp-content/uploads/2019/03/best-led-lights-garage.jpg)
 Proper garage lighting is a high priority for those of us who spend a lot of quality time working on home repair projects, maintaining our vehicles, or engaging in a hobby.


 One reason for traditional bulbs’ long-standing popularity is the quality of the light they provide. Most people find incandescent light gives a warm and comfortable glow, while alternatives are often seen as harsh, cold, and clinical.
